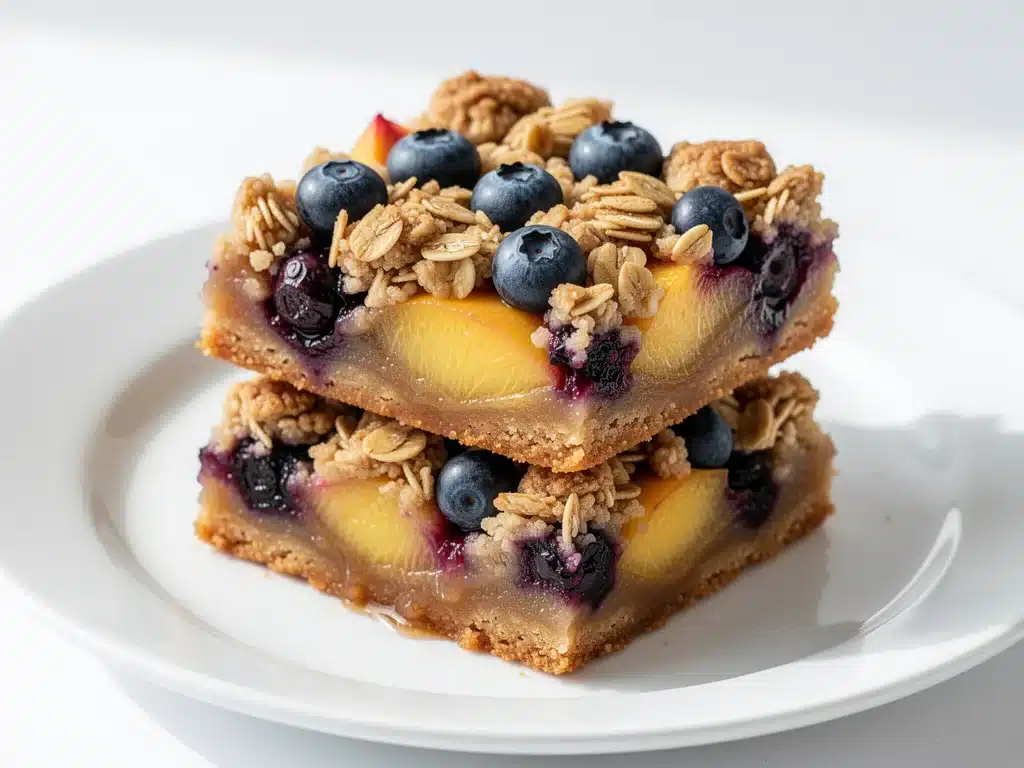
I still remember the exact moment I knew I had to share this recipe. It was late August, the kind of humid Labor Day weekend where the air feels thick enough to chew, and the sun refuses to set before 8 PM. My family had just finished a massive grill-out—burgers, corn on the cob, the works—and we were all sitting on the back porch, sweating and full, when I pulled these bars out of the oven. They were still warm, the scent of caramelized peaches and tart blueberries mixing with the buttery, crumbly topping.
My dad, who is notoriously difficult to please when it comes to dessert (he prefers black coffee and nothing sweet), took one bite, paused, and asked for the recipe. That’s high praise. But the real test came the next morning. My teenage son, who usually skips breakfast, wandered into the kitchen, grabbed a cold bar straight from the fridge, and mumbled, “Mom, this is actually good.” That’s when I knew these Labor Day Blueberry Peach Crisp Bars weren’t just a seasonal novelty—they were a keeper.
There’s something magical about the transition from summer to fall. The peaches are at their peak sweetness, the blueberries are plump and juicy, and the weather is just cool enough to justify turning the oven on. I’ve made these bars for three Labor Days in a row now, and they’ve become the unofficial start of my fall baking season. They’re sturdy enough to pack for a picnic, beautiful enough to serve at a dinner party, and simple enough to throw together on a Tuesday night when you need a win.
What makes these bars special isn’t a complicated technique or a pantry full of obscure ingredients. It’s the balance. The tartness of the berries cuts through the sweetness of the peaches, and that crumbly, oat-based topping adds the perfect texture contrast. It’s rustic, it’s nostalgic, and it tastes like a summer evening that you never want to end. I’ve tweaked the ratio of fruit to topping several times, and I’m confident this is the version that works best. Whether you’re feeding a crowd or just treating yourself, these bars are going to become your new go-to.
Why You’ll Love This Recipe
Let’s be real: most fruit crisps are great, but they can be messy to serve. You know the type—the filling leaks out the sides, the topping gets soggy if you wait too long, and cutting a neat slice is a battle against culinary chaos. These Labor Day Blueberry Peach Crisp Bars solve all those problems. I’ve designed them to be portable, stable, and seriously addictive.
Perfectly Portable — Unlike a traditional crisp in a glass dish, these bars hold their shape. I’ve cut them into squares and packed them in Tupperware for office potlucks, picnics, and car trips. They don’t crumble into a mess. They travel well, which is huge for Labor Day weekends when everyone is heading somewhere.
Texture Heaven — The topping is the star here. It’s not just a streusel; it’s a buttery, oat-laden crumble that stays crisp even after sitting in the fridge for a couple of days. I’ve tested this, and I promise you, the texture holds up. It’s crunchy on the outside, chewy in the middle, and melts in your mouth.
Seasonal Simplicity — You don’t need fancy ingredients. Just peaches, blueberries, oats, flour, butter, and sugar. If you have a farmers market nearby, this is your moment. If you’re using frozen fruit (which I do in a pinch), it still works beautifully. It’s low-stress baking for high-reward results.
Make-Ahead Friendly — This is my secret weapon for busy weekends. I can bake these on Saturday morning, let them cool, and store them in the fridge. When guests arrive on Sunday, they’re ready to go. No last-minute panic, no warm-up time needed. Cold or room temperature, they’re delicious.
Big Flavor, Small Effort — The combination of peaches and blueberries is classic for a reason. It’s sweet, tart, and fruity without being one-dimensional. The lemon juice and cinnamon in the topping add depth that makes it taste like you spent hours in the kitchen, even though it’s mostly hands-off baking time.
This recipe has saved me more times than I can count. It’s my answer to “What can I bring to the potluck?” or “What dessert should I make when I don’t feel like making a cake?” It’s reliable, it’s tasty, and it always gets compliments. Trust me, once you make these, you’ll understand why.
Ingredients You’ll Need
Here’s the good news: you probably have most of these ingredients in your pantry already. This recipe relies on simple, accessible components. I’m particular about a few things, though, and I’ll tell you exactly why they matter. Getting the right ingredients makes the difference between good bars and amazing bars.
For the Fruit Filling
Ripe Peaches (3 large, peeled and sliced / about 900g) — This is non-negotiable. You need ripe, fragrant peaches. If they’re hard or flavorless, the bars will be bland. Look for peaches that give slightly to pressure and smell sweet. Yellow peaches are sweeter; white peaches are more tart. I prefer yellow for this recipe. If you’re in peak season, buy them at a farmers market. If not, frozen peaches (thawed and drained) work in a pinch.
Fresh Blueberries (2 cups / 300g) — Fresh is best, but frozen works too. If you use frozen, don’t thaw them completely before adding—they’ll release too much water. Toss them in the flour mixture first to prevent sinking. Blueberries add a nice tart contrast to the sweet peaches. Wild blueberries are smaller and more intense, which I love, but regular ones are fine.
Granulated Sugar (½ cup / 100g) — Adjust based on the sweetness of your fruit. If your peaches are super sweet, cut this to ⅓ cup. If they’re tart, keep it at ½ cup. I taste my fruit before adding sugar to decide.
Lemon Juice (2 tablespoons / 30ml) — This is crucial. The acid brightens the fruit and prevents oxidation (browning). It also balances the sweetness. Don’t skip it. Freshly squeezed is best, but bottled works if that’s all you have.
Cornstarch (2 tablespoons / 15g) — This thickens the juices so you don’t end up with a soupy mess. If you don’t have cornstarch, use tapioca starch. Avoid flour—it can make the filling gummy.
Vanilla Extract (1 teaspoon / 5ml) — Just a hint. Enhances the fruit flavor without overpowering it. Pure vanilla is worth the extra cost.
For the Crumbly Oat Topping
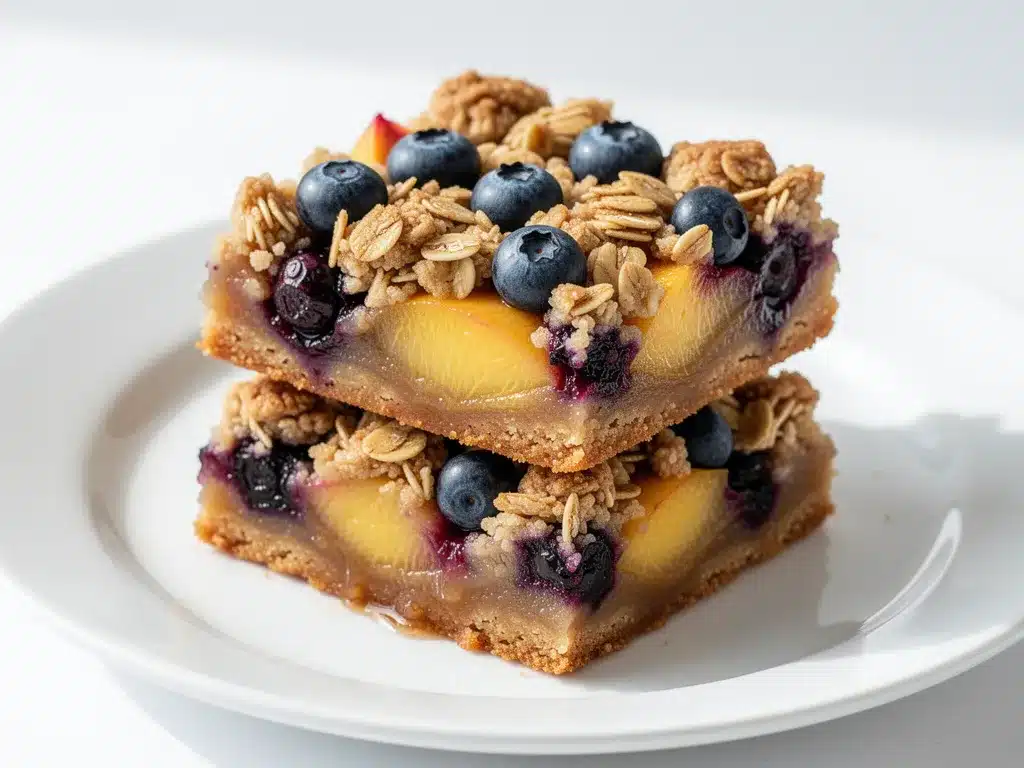
Old-Fashioned Rolled Oats (1½ cups / 120g) — Do not use instant oats or steel-cut oats. Old-fashioned oats have the right texture—they absorb moisture but stay chewy. If you only have quick oats, pulse them in a food processor for a few seconds to break them up slightly.
All-Purpose Flour (1 cup / 125g) — Gives structure to the topping. Don’t use cake flour—it’s too delicate. Don’t use bread flour—it’s too chewy. All-purpose is the sweet spot.
Light Brown Sugar (½ cup / 100g) — Packed. Brown sugar adds moisture and a caramel-like depth that white sugar can’t match. It’s essential for that crisp bar flavor. Dark brown sugar is too intense; stick with light.
Ground Cinnamon (1 teaspoon / 2g) — Warm, aromatic, and classic. Don’t be shy with it. If you like spice, add a pinch of nutmeg or allspice. But cinnamon is the star here.
Salt (½ teaspoon / 3g) — Balances the sweetness. Never skip salt in baking. It makes the other flavors pop.
Unsalted Butter (½ cup / 113g, cold and cubed) — This is where the magic happens. Cold butter creates flaky, crumbly textures. If you use melted butter, the topping will be more like a cake. Cut the butter into small cubes so it mixes easily. If you’re in a rush, grate frozen butter—it works great.
Optional: Chopped Pecans or Walnuts (½ cup / 60g) — I sometimes add nuts for extra crunch and richness. If you’re allergic or don’t like nuts, skip them. The bars are still delicious without them.
For the Base Layer (Optional but Recommended)
Flour (½ cup / 60g)
Brown Sugar (¼ cup / 50g)
Butter (¼ cup / 57g, melted)
This base layer prevents the fruit from making the bottom soggy. It’s a thin crust that adds stability. If you want to keep it simple, you can skip it, but I highly recommend it for the best texture.
Equipment Needed
You don’t need fancy gadgets for this. Here’s what I actually use in my kitchen.
9×13 Inch Baking Dish — A standard glass or metal pan works best. Glass heats evenly; metal browns faster. I prefer glass because I can see the bottom browning. Make sure it’s deep enough to hold the fruit without spilling.
Mixing Bowls — Two medium bowls. One for the fruit, one for the topping. I use stainless steel because they’re sturdy and easy to clean.
Pastry Cutter or Fork — For cutting the butter into the dry ingredients. A pastry cutter is faster, but a fork works fine if you’re lazy like me. I sometimes use my hands if the butter is soft enough, but cold butter requires a tool.
Peeler — For peeling the peaches. A Y-peeler is easiest. If the peaches are very ripe, you can boil them for 30 seconds and peel the skins off, but a peeler is faster.
Knife and Cutting Board — For slicing peaches. A serrated knife works well for soft fruit. Be careful—ripe peaches are slippery.
Cooling Rack — Essential for cooling the bars evenly. If you leave them in the hot pan, the bottom will steam and get soggy. Trust me on this.
Cling Wrap or Airtight Container — For storage. These bars keep well covered to prevent drying out.
Measuring Cups and Spoons — Standard stuff. I use metal measuring cups for dry ingredients and liquid measuring cups for wet ones. Accuracy matters in baking.
Optional: Food Processor — If you’re making the base layer or topping in bulk, a food processor speeds things up. But it’s not necessary. I usually mix by hand.
That’s it. No stand mixer, no special pans, no weird gadgets. Just basic kitchen tools. If you have these, you’re ready to bake.
How to Make It: Step-by-Step
Alright, let’s make these Labor Day Blueberry Peach Crisp Bars! I’m walking you through exactly how I do it, including the little tricks I’ve picked up over the years. This isn’t complicated, but attention to detail makes a big difference.
Step 1: Prep Your Oven and Pan (5 minutes)
Preheat your oven to 350°F (175°C). This is a moderate temperature that cooks the fruit through without burning the topping. Grease your 9×13 inch baking dish with butter or non-stick spray. I like to line it with parchment paper for easy removal, but it’s not strictly necessary. Just make sure the corners are greased well.
Step 2: Make the Base Layer (5 minutes)
In a small bowl, mix the ½ cup flour, ¼ cup brown sugar, and ¼ cup melted butter until it forms a crumbly mixture. Press this mixture firmly into the bottom of your prepared baking dish. Use your fingers or the back of a spoon to create an even layer. This base will protect the bottom from getting soggy. Set it aside.
Step 3: Prepare the Fruit Filling (10 minutes)
Peel and slice your peaches. If you’re using fresh blueberries, rinse and dry them. In a large bowl, combine the sliced peaches, blueberries, granulated sugar, lemon juice, cornstarch, and vanilla extract. Toss gently until everything is evenly coated. Taste a piece of peach—if it’s very sweet, you can reduce the sugar slightly. Pour the fruit mixture over the base layer in the pan. Spread it out evenly.
Step 4: Make the Topping (5 minutes)
In another bowl, whisk together the 1 cup flour, ½ cup brown sugar, cinnamon, and salt. Add the cold, cubed butter. Use a pastry cutter, fork, or your fingers to cut the butter into the dry ingredients until the mixture resembles coarse crumbs. Some pieces should be pea-sized, and some should be larger. This texture is key for a crisp topping. If you have nuts, fold them in now.
Step 5: Assemble and Bake (45-50 minutes)
Sprinkle the topping evenly over the fruit layer. Don’t press it down—let it be loose and crumbly. This allows air to circulate and keeps it crisp. Place the pan in the preheated oven and bake for 45-50 minutes. You’ll know it’s done when the topping is golden brown and the fruit is bubbling vigorously around the edges. If the topping is browning too fast, cover it loosely with foil after 30 minutes.
Step 6: Cool Completely (1-2 hours)
This is the hardest part: waiting. Remove the pan from the oven and place it on a cooling rack. Let the bars cool completely in the pan. This usually takes 1-2 hours. If you cut them while they’re hot, they’ll fall apart. The filling needs time to set. I know it’s tempting, but patience pays off. Once cooled, cover with cling wrap or transfer to an airtight container.
Step 7: Cut and Serve
Use a sharp knife to cut the bars into squares. I like 12-16 bars, depending on how hungry your guests are. Serve at room temperature or chilled. They’re delicious with a scoop of vanilla ice cream or a dollop of whipped cream. But honestly? They’re great on their own.
Total Time: About 1 hour 30 minutes (20 minutes active, 1 hour 10 minutes mostly hands-off)
Troubleshooting: If the topping isn’t crisp, you might have used melted butter instead of cold. Next time, ensure the butter is cold. If the filling is runny, you didn’t let it cool long enough, or you didn’t use enough cornstarch. Let it sit longer next time.
Expert Tips & Tricks
Here’s everything I’ve learned from making these bars dozens of times. These tips will save you from my mistakes.
Use Cold Butter
This is the #1 tip. Cold butter creates those flaky, crumbly textures. If your butter is soft, the topping will be dense. Cube it and keep it in the fridge until the last minute. If you’re worried it’s too cold, let it sit on the counter for 5 minutes. But don’t melt it.
Don’t Skip the Base Layer
I know it’s extra work, but the base layer prevents sogginess. Fruit releases a lot of juice, and without that crust, the bottom of your bars will be mushy. It’s worth the extra 5 minutes.
Adjust Sugar to Taste
Fruit sweetness varies wildly. Taste your peaches before adding sugar. If they’re bland, add more. If they’re super sweet, add less. The topping has brown sugar, which is sweet, so the filling should be slightly tart to balance it.
Cool Completely
I can’t stress this enough. Hot bars are messy. Cold bars hold their shape. If you’re in a hurry, you can chill them in the fridge for 30 minutes, but room temperature is best for flavor.
Common Mistakes
Mistake: Topping is soggy
Fix: You didn’t bake it long enough, or you covered it too early. Bake until golden and bubbling. Don’t cover until it’s fully cooled.
Mistake: Filling is runny
Fix: You didn’t use enough cornstarch, or you cut it too soon. Let it cool longer. Next time, add an extra tablespoon of cornstarch.
Pro Tricks
For Extra Crunch
Add a tablespoon of rolled oats to the topping. It adds texture and absorbs some moisture.
For Better Flavor
Add a pinch of cardamom or nutmeg to the topping. It complements the fruit beautifully.
For Presentation
Dust the cooled bars with powdered sugar before serving. It looks elegant and adds a touch of sweetness.
Variations & Substitutions
Once you’ve nailed the basic version, here’s how you can mix it up. I’ve tried all of these.
Strawberry Rhubarb Version
Swap peaches for sliced strawberries and rhubarb. Use 3 cups strawberries and 2 cups rhubarb. Add an extra tablespoon of cornstarch. It’s tart and sweet—perfect for spring.
Apple Cinnamon Version
Use 4 cups sliced apples (Granny Smith or Honeycrisp). Add 1 teaspoon of cinnamon to the filling. Reduce sugar to ¼ cup. It’s like apple pie in bar form.
Mixed Berry Version
Replace peaches with 4 cups mixed berries (blackberries, raspberries, blueberries). Use frozen berries—they’re cheaper and just as good. Add an extra tablespoon of cornstarch.
Gluten-Free Version
Use a 1:1 gluten-free flour blend in the topping and base. Make sure your oats are certified gluten-free. Everything else is naturally gluten-free.
Dairy-Free Version
Replace butter with vegan butter or coconut oil. Use coconut oil for a slightly coconutty flavor. The texture will be slightly different but still delicious.
Nut-Free Version
Simply omit the nuts. The bars are still great without them. If you want crunch, add extra oats or a few chopped pecans if allergies allow.
Mini Bars
Use a 9×9 inch pan for thicker bars. Bake time will be similar, but check for doneness a few minutes earlier. Great for gift-giving.
Serving & Storage
How to Serve:
I usually serve these at room temperature, but they’re also great chilled. I like to pair them with a scoop of vanilla ice cream or a dollop of whipped cream. For a fancy touch, add a mint leaf on top. They’re perfect for potlucks, picnics, or just a quiet evening at home.
Side Dishes:
These bars are a dessert, so they pair well with coffee or tea. If you’re serving a meal, they’re great after a BBQ or a summer dinner. They’re not too heavy, so they don’t overwhelm the palate.
Storage Instructions:
Refrigerator: Store in an airtight container for up to 5 days. They keep well in the fridge, and the flavors actually meld together over time. I find they taste even better on day two.
Freezing: Yes, you can freeze these! Wrap the whole pan tightly in plastic wrap and then foil. Freeze for up to 3 months. Thaw in the fridge overnight before serving. You can also freeze individual bars wrapped in plastic.
Reheating: If you want them warm, microwave a bar for 20-30 seconds. Or bake the whole pan at 350°F for 10 minutes. But honestly, they’re best cold or room temperature.
Pro Tip:
If you’re making these for a gift, wrap the pan in festive paper or tie a ribbon around it. They make a wonderful housewarming or hostess gift. Just add a card with the recipe!
Nutrition Information
I’m not a nutritionist, but here’s the breakdown if you’re tracking. This is per bar (based on 12 servings).
| Nutrient | Amount |
|---|---|
| Calories | 280 |
| Protein | 3g |
| Carbs | 45g |
| Fiber | 3g |
| Sugar | 28g |
| Fat | 10g |
| Saturated Fat | 6g |
| Cholesterol | 25mg |
| Sodium | 180mg |
What’s Good:
It has some fiber from the oats and fruit. It’s a decent treat that’s not overly processed. You can adjust the sugar to make it lighter.
What to Know:
It’s higher in sugar because of the fruit and brown sugar. It contains dairy and gluten. It’s not a diet food, but it’s better than most store-bought desserts.
My Take:
Look, this is a dessert. Enjoy it in moderation. I usually have one bar with my coffee in the morning. It’s satisfying and tastes homemade. When I want to make it lighter, I use less sugar in the topping and add more fruit. But usually? I just enjoy it as is.
Final Thoughts
So that’s my Labor Day Blueberry Peach Crisp Bars! I’ve probably talked your ear off at this point, but when you make a recipe this often, you have a lot to say about it. This has become my go-to summer dessert. It’s my answer to “What should I bake when I want something easy but impressive?”
These bars have saved me more times than I can count. They’re reliable, they’re tasty, and they always get compliments. My family loves them, my friends request them, and I’m happy because I’m not stressed about cooking. They’re the perfect blend of rustic and refined.
Make it yours! Try different fruits, swap in your favorite nuts, adjust the sweetness. The best recipes are the ones you adapt to your tastes. If you make these, drop a comment and let me know what you think! I love hearing how recipes turn out in your kitchen. And if something doesn’t work, tell me that too—I’m here to help troubleshoot.
Happy baking! And I hope your kitchen smells half as good as mine does right now.
Frequently Asked Questions
Can I use frozen peaches instead of fresh?
Yes, you can! Use about 3 cups of frozen peaches. Thaw them slightly and drain off excess liquid before adding to the filling. Frozen blueberries work too—just don’t thaw them completely, or the bars will be too wet. Frozen fruit is great in the off-season.
Why did my bars turn out soggy?
This usually happens if you cut them while they’re still warm, or if you didn’t use enough cornstarch. Fruit releases a lot of juice, and the cornstarch helps thicken it. Let the bars cool completely in the pan. Next time, add an extra tablespoon of cornstarch to the filling.
Can I make these ahead of time?
Absolutely. These bars are actually better the next day. Bake them 1-2 days ahead, let them cool, and store in the fridge. They’ll hold their shape perfectly. You can also freeze them for up to 3 months.
What kind of oats should I use?
Use old-fashioned rolled oats. They have the right texture—chewy but not mushy. Do not use instant oats (they dissolve) or steel-cut oats (they’re too hard). If you only have quick oats, pulse them in a food processor for a few seconds.
Can I add nuts to the topping?
Yes! Chopped pecans or walnuts add a nice crunch and richness. I usually add ½ cup. If you’re allergic, just skip them. The bars are still delicious without nuts.
How do I store leftovers?
Store in an airtight container in the fridge for up to 5 days. They keep well covered to prevent drying out. You can also freeze them for up to 3 months. Thaw in the fridge overnight before serving.
Can I double this recipe?
Yes, but you’ll need a larger pan. Use a 9×13 inch pan if you’re doubling, or use two 9×9 inch pans. The baking time will be similar, but check for doneness a few minutes earlier. Don’t overcrowd the pan, or the bars won’t bake evenly.
Pin This Recipe!
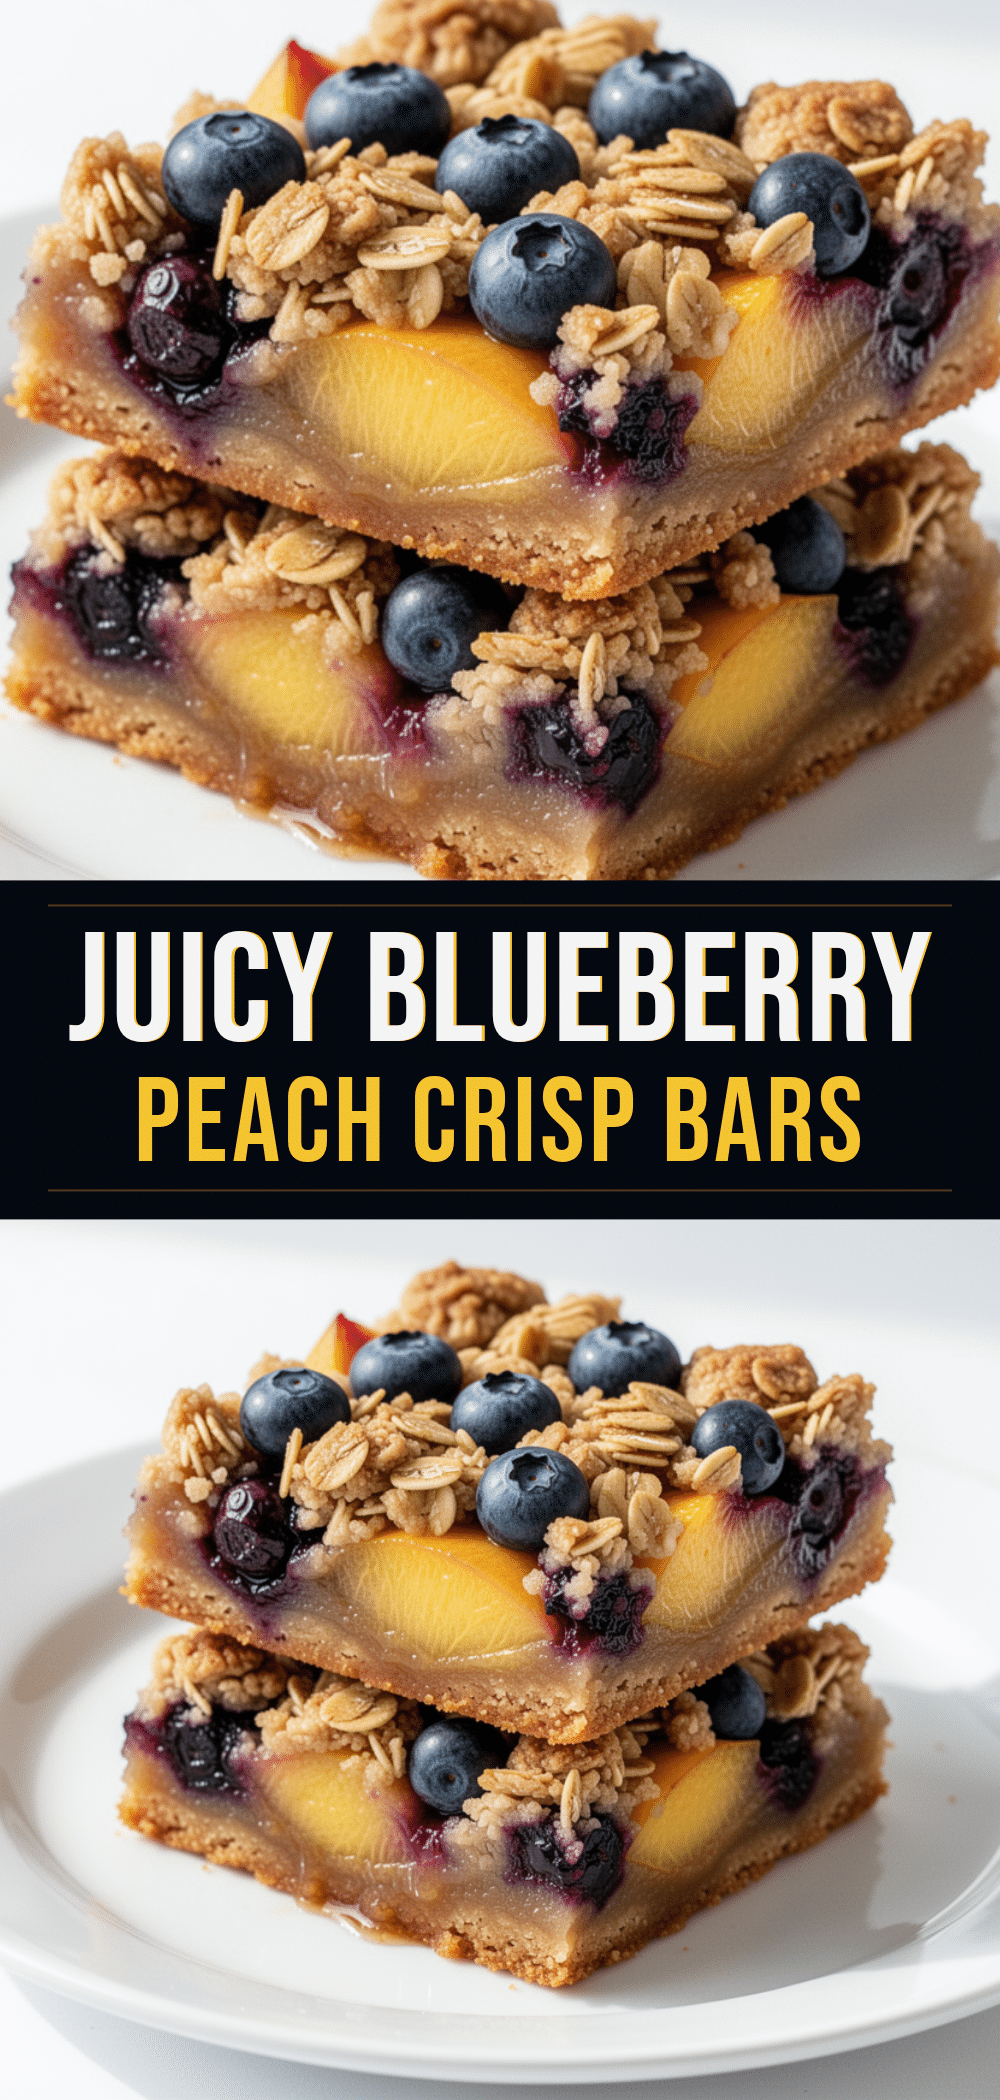
Labor Day Blueberry Peach Crisp Bars
- Total Time: 1 hour 30 minutes
- Yield: 12 servings 1x
Description
A rustic, portable dessert featuring a buttery oat crumble topping over a sweet and tart filling of peaches and blueberries, with an optional base layer to prevent sogginess.
Ingredients
- 3 large ripe peaches, peeled and sliced (about 900g)
- 2 cups fresh blueberries (300g)
- 1/2 cup granulated sugar (100g)
- 2 tablespoons lemon juice (30ml)
- 2 tablespoons cornstarch (15g)
- 1 teaspoon vanilla extract (5ml)
- 1 1/2 cups old-fashioned rolled oats (120g)
- 1 cup all-purpose flour (125g)
- 1/2 cup light brown sugar, packed (100g)
- 1 teaspoon ground cinnamon (2g)
- 1/2 teaspoon salt (3g)
- 1/2 cup unsalted butter, cold and cubed (113g)
- 1/2 cup chopped pecans or walnuts, optional (60g)
- 1/2 cup flour (60g) for base layer
- 1/4 cup brown sugar (50g) for base layer
- 1/4 cup unsalted butter, melted (57g) for base layer
Instructions
- Preheat oven to 350°F (175°C). Grease a 9×13 inch baking dish and line with parchment paper if desired.
- For the base layer, mix 1/2 cup flour, 1/4 cup brown sugar, and 1/4 cup melted butter until crumbly. Press firmly into the bottom of the prepared pan and set aside.
- In a large bowl, combine sliced peaches, blueberries, granulated sugar, lemon juice, cornstarch, and vanilla. Toss to coat evenly.
- Pour the fruit mixture over the base layer in the pan and spread evenly.
- In a separate bowl, whisk together 1 cup flour, 1/2 cup brown sugar, cinnamon, and salt. Add cold cubed butter and cut in using a pastry cutter or fork until the mixture resembles coarse crumbs.
- Fold in chopped nuts if using. Sprinkle the topping evenly over the fruit layer without pressing down.
- Bake for 45-50 minutes until the topping is golden brown and the fruit is bubbling. Cover loosely with foil if browning too quickly.
- Cool completely in the pan on a wire rack for 1-2 hours to allow the filling to set.
- Cut into 12-16 squares and serve at room temperature or chilled.
Notes
Use cold butter for the topping to ensure a crisp texture. Do not skip the base layer to prevent a soggy bottom. Cool completely before cutting to ensure bars hold their shape. Can be stored in the fridge for up to 5 days or frozen for up to 3 months.
- Prep Time: 20 minutes
- Cook Time: 45-50 minutes
- Category: Dessert
- Cuisine: American
Nutrition
- Serving Size: 1 bar
- Calories: 280
- Sugar: 28
- Sodium: 180
- Fat: 10
- Saturated Fat: 6
- Carbohydrates: 45
- Fiber: 3
- Protein: 3
Keywords: blueberry peach crisp, labor day dessert, fruit bars, oat crumble, summer baking, make-ahead dessert


